
Abstract - last modified 2019-03-28
How to reset (lost) passwords by launching a root-shell on boot (with Linux Mint).
This tutorial shows how to boot into a root-shell in cases where one can't use the root-shell option via a recovery grub-menu entry (like an unknown root-pw has been set, or parts of the init-process would fail in some way).
Use at your own risk - you have to read and accept the disclaimer
Alternatives
If you are able to use of the root-shell option offered by the grub-menu recovery-options (see the advanced section there), you should prefer accessing a root-shell this way instead.
If you prefer a point&click tool, you can boot a live-mint (the install-media) and use ot-reset-pw from there.
Long story short
This is a short summary for the experienced user, needing only the essential bits. If you are new user needing more details - skip this section!
- enter grub-menu on boot
- edit parameters for current kernel:
- replace " ro quiet splash $vt_handoff " with " rw init=/bin/bash "
- continue booting with CTRL+x
- run passwd <user-account-name> # using the real user account
- run sync # and reboot using CTRL+ALT+DEL
Motivation
The password-less login-feature of Linux Mint (offered during installation or at the installed system), allows to define/select a user which will automatically logged in after boot, without having to enter the credentials at the login-dialog.
Setting a password during the installation, the password complexity gets "rated" while entering it. As serious users do like to get some "good" rating for their password, they are using something more cryptic, forgetting to write down some note about it.
And not having to use the password frequently at login might lead to .... you are reading this tutorial.
Objective
The tutorial shows how to use the features of grub for gaining access to a root-shell during boot. Which does allow to replace current user passwords. You wont be able to determine the current password, but have to set a new one for security reasons.
Remarks
This is NO tutorial for wanna-be hackers. Be warned, the legitimate owner, or a company offering according services, will be able to notice the modification and you wont be able to undo the change later on without leaving traces.
Besides being able to run all available commands from the root-shell, which would allow one to break an installation easily, the required modification to gain access to the root-shell wont change anything permanently to grub itself. Thus with the next reboot grub will just behave as before.
The current version of the tutorial does not cover the situation where the root-partition has been encrypted using dm-crypt/luks (you are required to unlock encrypted root-devices on your own when being asked for).
Steps
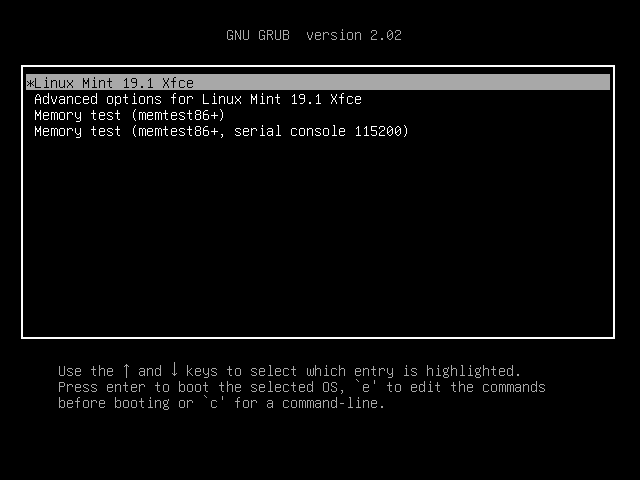
1 - Enter grub menu on boot
Many installations wont show the grub-menu on startup, but just (display a logo and continue to) boot to the graphical login-tool. If your installation does show the grub-menu right away from the start, you can skip this step.
In the sample a mint 19.1 xfce 64bit vm is used, which has been installed in bios-mode (hence showing the two bottom entries for "memtest" - which will not be there for an (u)efi-system).
Entering grub-menu on boot does require you to use the "correct" key and is a bit tricky, as it's easy to miss just the right moment.
Some machines are handling keypress-events delayed on a "cold-boot" (= when you turn on the machine), which will work on a second reboot (warm-boot) normally.
If you missed the right moment for any reason and get the graphical login displayed: Just select the "Quit..." option at the power-symbol top-right and select the "Restart" option afterwards to reboot.
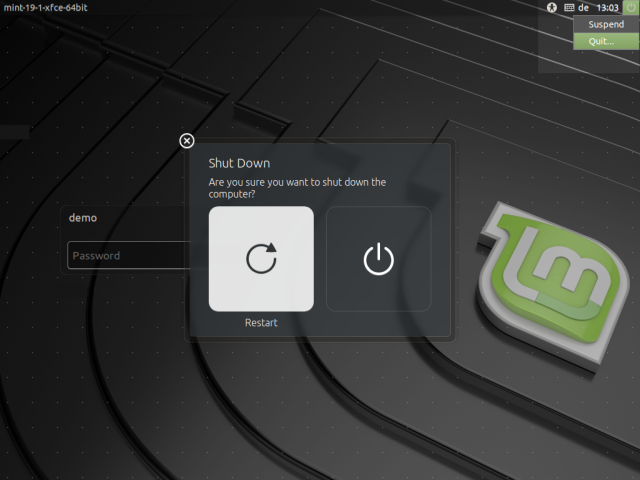
If you are stuck at a black-screen with a blinking cursor: pressing CTRL+ALT+DEL should reboot too.
As it depends on your specific setup (bios, uefi), there are two distinct methods to enter the grub-menu on boot, where only one will work with your machine, you just have to test it.
1-1 - SHIFT-key
Press and hold (important) the left SHIFT -key until grub-menu does show up. If this does not work (even after a reboot) - you will likely have to use the other method.
1-2 - ESC-key
Press the ESC -key (probably multiple times) but do NOT keep it pressed.
Other than with the SHIFT -key, many machines do not like it, if regular keys like ESC are being used too early during boot. A good point to start with the ESC -key is right after keyboard-init (many keyboards will flash shortly the leds at that occasion).
What you might face too: Some machines do use the ESC -key itself to offer additional (boot-) options before grub does get into the game. Most of them do offer a " continue boot " option in that case; use the ESC -key again afterwards to enter the grub-menu should work now.
2 - The grub main-menu
The grub main-menu does lists current available boot options and does give access to some of its extended functions . The top entry does typically reflect the current linux boot default in use and will (normally) be preselected/highlighted.
Linux-related additional boot entries (like available kernel-versions, or "recovery-mode" ) are (with a current default-setup) accessible using the "Advanced options ..."-entry.
If there are other OS - like windows - available, they will get listed in the lower part of the grub-menu.
If the system is used in bios-mode (or legacy- aka cms-support is enabled with (u)efi-systems) the last two entries will offer "memtest"-options to test the memory of the machine for defects.
Many linux installations will display a timeout counter (default-setup = 30 s) at the bottom of the grub-menu. If no further key is pressed after entering the grub menu, the active/highlighted menu entry will get used to continue booting after the timeout expired.
Available keystrokes for navigation and usage of the offered functions of grub are displayed at the bottom of the screen.
For an installed linux (mint) the grub main-menu will list:
- cursor keys - select/highlight next/previous menu-entry
- enter - boot/execute selected/highlighted menu-entry
- e - edit details of the current highlighted entry
- c - get a command-line (busy-box)
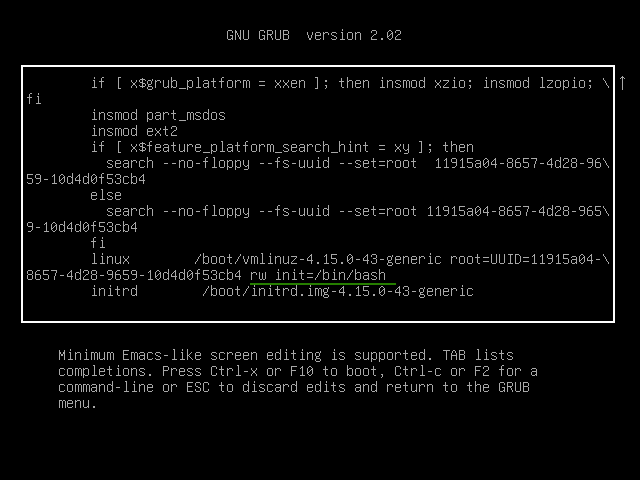
3 - Get a root-shell by editing kernel parameters
With Linux Mint there exist multiple ways to gain access to the root-shell - the most basic one is to adjust kernel parameters.
With the (top) linux mint entry selected in the main menu, press e to enter edit-mode.
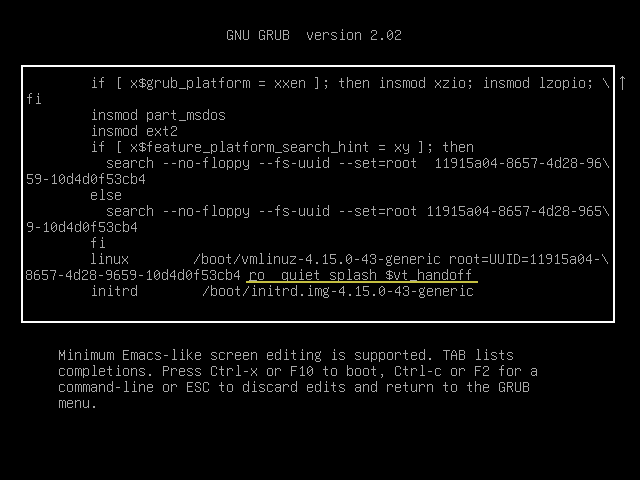
Using the cursor -keys - scroll down to the line starting with "linux" (2nd last line of the details).
Go to the end of the line - using cursor -keys or just press END .
People without an en-US keyboard will likely have to lookup some keys:
![logo - [click to enlarge]](/Entities/pages/main_workarounds/mint_reset_pw/keyboard-1280x552.png "[click to enlarge]")
[click to enlarge]
Delete " ro quiet splash $vt_handoff " using the Backspace -key and add
rw init=/bin/bash
there instead (all in lower-case as linux is case-sensitive).
Remarks - Parameters
The given parameter " ro " (=readonly-mode) has to be replace by " rw " to mount the root-filesystem in read-write-mode, to be able to modify files there.
By (ab-)using " init=/bin/bash ", the regular init-system gets replaces by a bash root-shell. As a side-effect there will be no password needed and the user with uid=0 (root) will be in use, which does allow access to all relevant files and applications.
Removing " quiet splash $vt_handoff " = just removing irrelevant "cosmetics" we do not care about at the moment, as " quiet " does prohibit boot-related text output (which might be good to see at the moment anyways), " splash " would try to switch to graphics mode normally, to display a splash-logo (not needed here and could cause unwanted trouble anyways) and finally does the grub-internal variable $vt_handoff contain nothing at all in most case, and bash wont care about it anyways. Thus just replacing the entire end of the kernel-line is just "easier".
To continue booting, just press CTRL+x and wait until the root-prompt " root@(none) # " does show up.
![logo - [click to enlarge]](/Entities/pages/main_workarounds/mint_reset_pw/mint_rpw_g.png "[click to enlarge]")
[click to enlarge]
If you get a prompt displayed " (initramfs) " with some lines above showing a version-info of "busy-box": you had some typo in your edits, or did delete parts of the UUID of the root-partition by mistake while editing. (good part of the message is: this didn't affect/corrupt the system) - just reboot using CTRL+ALT+DEL and try to avoid mistakes this time.
If everything did work as expected the output will look similar to:
![logo - [click to enlarge]](/Entities/pages/main_workarounds/mint_reset_pw/mint_rpw_f.png "[click to enlarge]")
[click to enlarge]
As it's likely to get still some more dangling message displayed after the root-prompt is reached/shown - just press enter to get a "fresh" input-line. Extra messages "spit out" while you are entering commands are not used as input (but are only "disturbing").
4 - Changing the password
Important: If you are using a non en-US keyboard - test first that your localized keyboard layout is in effect. Type some text (some special characters for example) at the prompt - just do not press enter but either use CTRL+c to abort edits or use backspace to remove the text when done.
If you notice that your localized keyboard-mapping is not in effect: use a simple password, avoiding all non mapped keys at the moment. After you did reboot and could login successfully, change the password to the final version from the GUI (where you have the correct keyboard-layout available).
To set a new password for a user just run the passwd -command followed by the user-name. This will prompt you 2 times to enter a new password, which will not get displayed while entering it; in the sample the password for the user "demo" is set by
passwd demo
After the password has changed, you will get a success-message shown.
If you had some typo/mismatch at password-entry, the passwd -command will show an according error-message: just repeat the passwd -command in that case.
If you get a message shown, mentioning that the user demo does not exist: you should read more carefully - and use a valid accountname of your system instead of "demo"!
If everything did work as expected, sync the filesystem to be sure all files are updated using:
sync
and finally press CTRL+ALT+DEL to reboot.
Good luck - have fun